Self-Hosting Next.js on Ubuntu VM with GitHub Actions for Automatic Deployments
Last updated on
In this step by step guide I will demonstrate how to self host Next.js applications on the virtual machine. Also we will add github actions for automatic deployments.
Provisioning machine
Provision a machine if you don’t have already. I personally use DigitalOcean or Hetzner. (links are affiliate).
For security purposes use SSH keys to login to machine.
Create new user
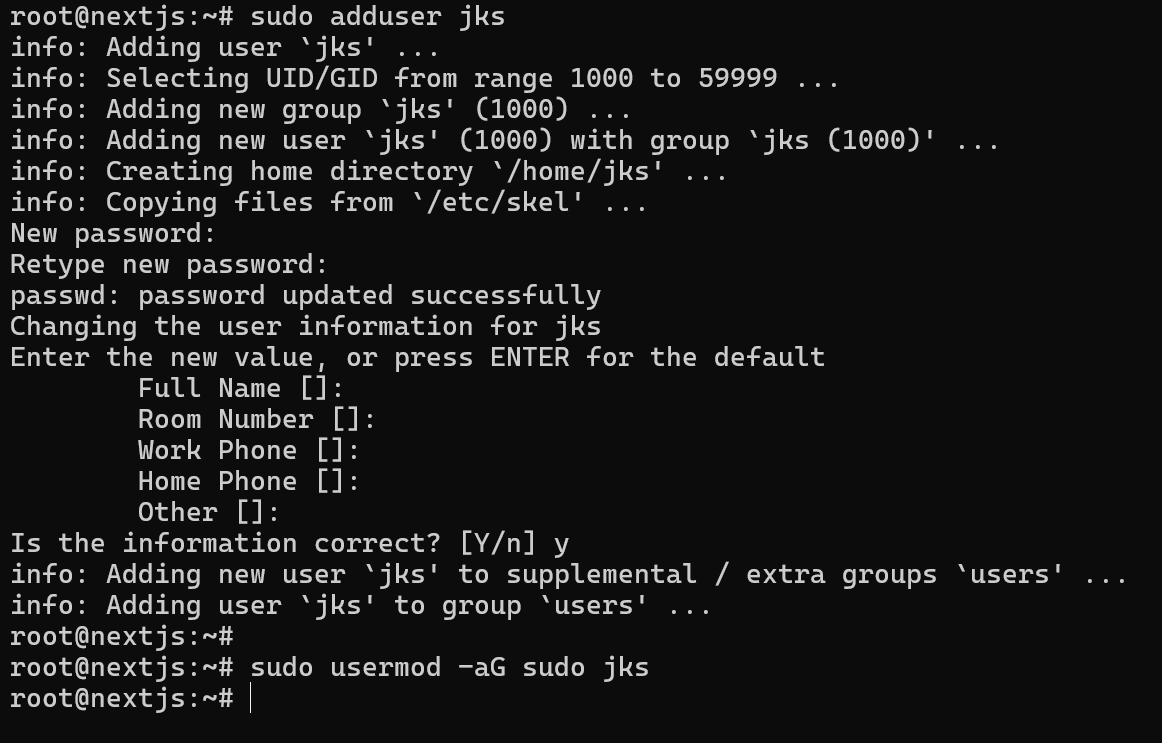
Log in to your machine and create a new user. Here I am creating a user called jks and will grant them sudo access.
sudo adduser jks

# sudo access
sudo usermod -aG sudo jks
Setting up SSH keys
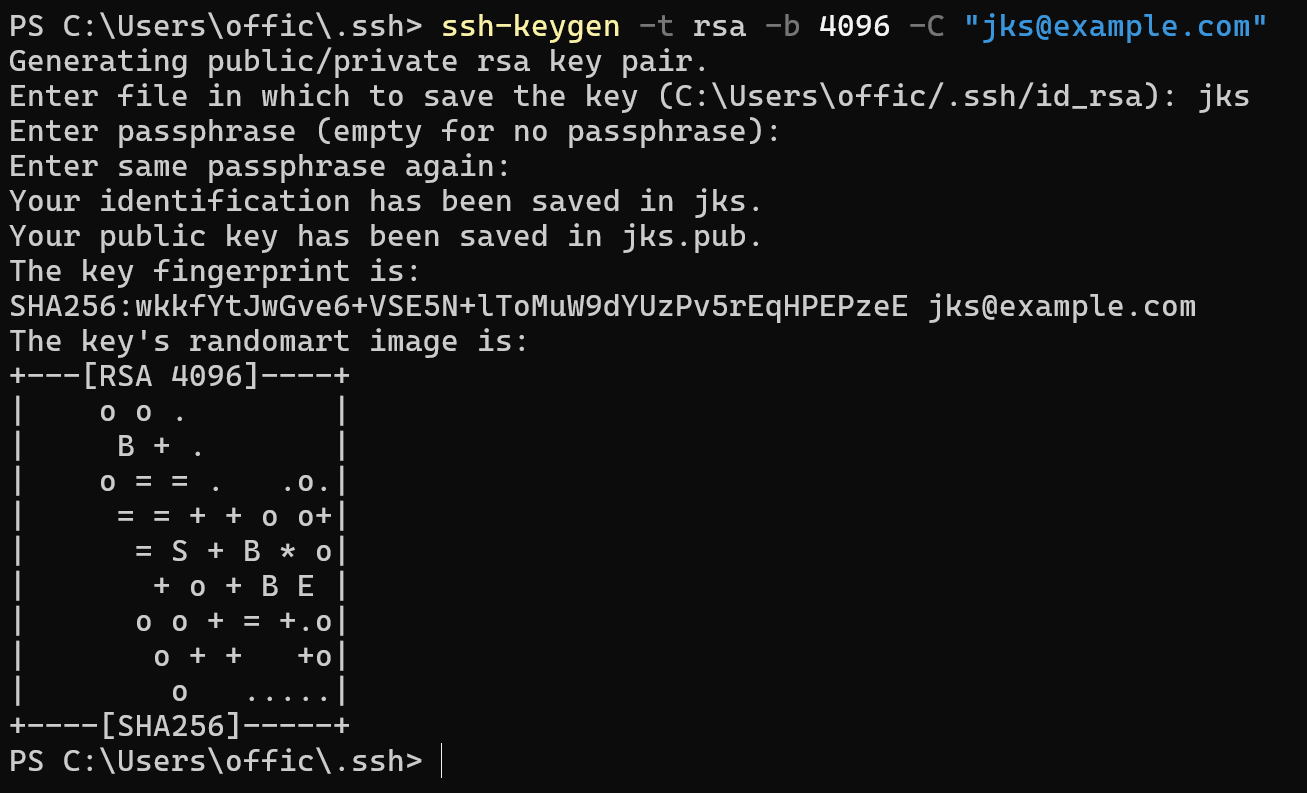
Now we need to setup SSH keys for the user. This will allow us to login to the machine using SSH keys. Open a terminal and run the following command.
For my machine I store every SSH key in the ~/.ssh directory. You can change this to any directory you want.
I am using using passphrase for additional security. It is like a password for the SSH key. So even if someone gets access to your machine they won’t be able to login to the machine using the SSH key.
Give any name to the SSH key. I am using jks as the name.
ssh-keygen -t rsa -b 4096 -C "[email protected]"
Now that we have the SSH key, we need to copy the public key to the server. Copy the public key to the clipboard.
Use the cat command to output the public key and copy it to the clipboard.
cat ./jks.pub
Now we need to add the public key to the authorized keys file. This will allow us to login to the machine using SSH keys.
Add SSH key to authorized keys
First login as the new user. You can do that while being logged in as root.
sudo su - jks
Create ssh directory if it doesn’t exist.
mkdir -p ~/.ssh
Create or open the authorized keys file.
cd ~/.ssh
nano ./authorized_keys
Add the public key to the authorized keys file and use Ctrl +S to save and Ctrl + X to exit.
Now let’s test if we can login to the machine using the SSH key.
ssh -i ~/.ssh/jks jks@server_ip
Make sure you replace server_ip with the IP address of your server. Also the name of the key should be the same as the one you created.
You should be able to login to the machine using the SSH key.

Installing Node.js
For the next step we need to install Node.js. We will use nvm to manage Node.js versions. For latest version of nvm, visit nvm github.
curl -o- https://raw.githubusercontent.com/nvm-sh/nvm/v0.40.0/install.sh | bash
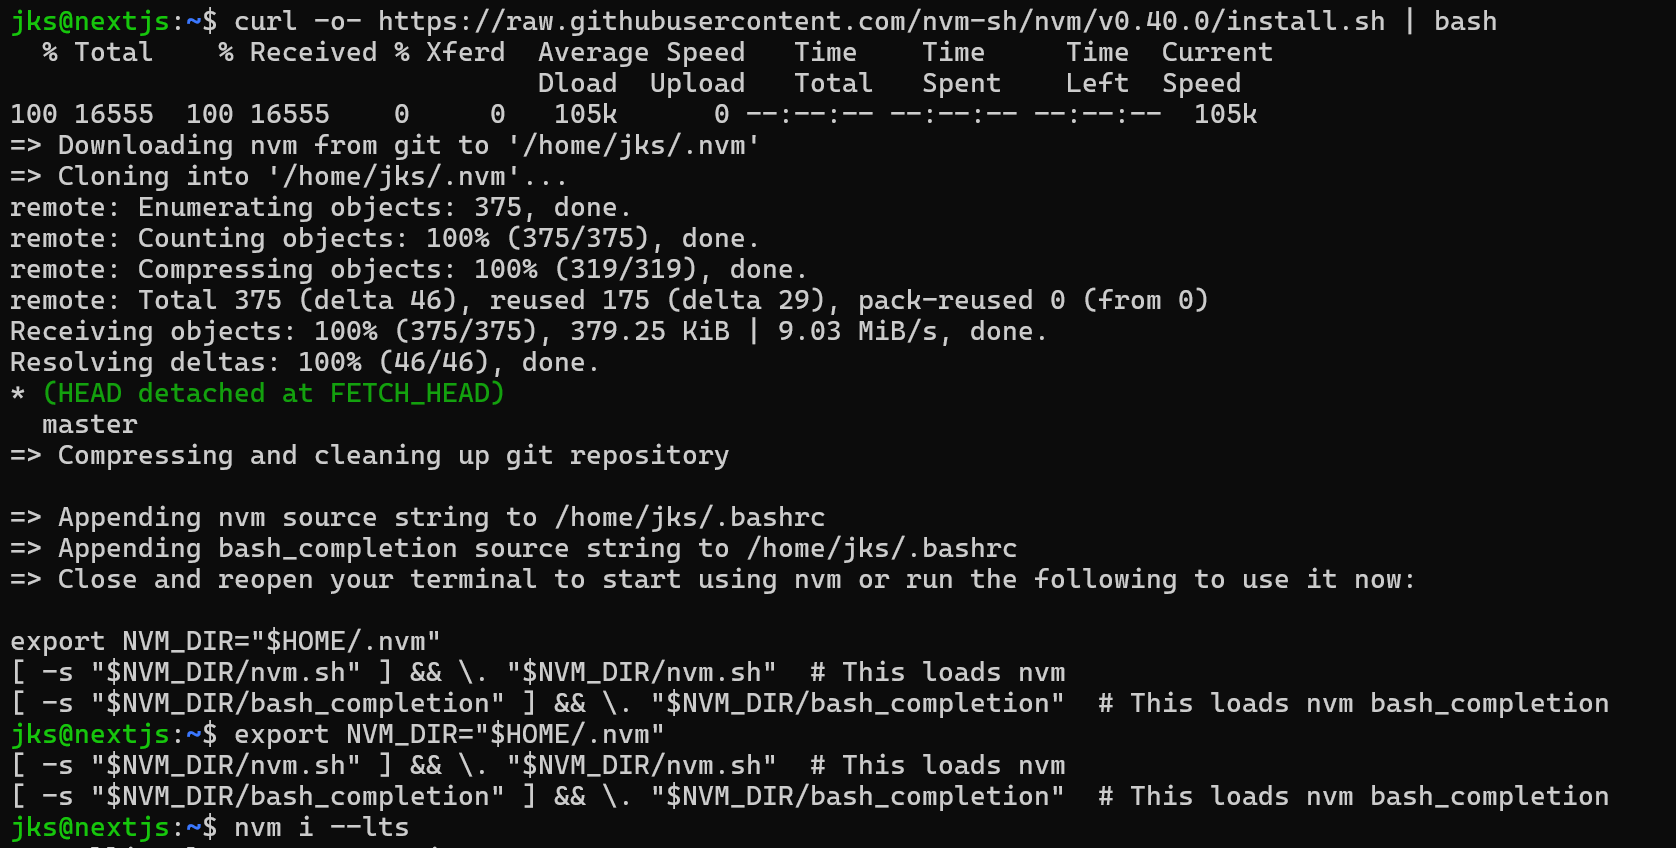
Now install the LTS version of Node.js.
nvm install --lts
After the installation is complete, you can check the version of Node.js.
node -v
Install pnpm
I used pnpm for installing dependencies. You can use any package manager you want. I am using pnpm because it is faster than npm.
npm install -g pnpm
Now we will have to set up the repo
Setting up the repo
If you are integrating into existing repo, you can skip this step. Else for following this guide you can use this repo as a starting point.
Make sure to add compress: false in your next.config.ts(next 15) or next.config.mjs(next 14). Reference
You can clone the repo and make changes to it.
If you have private repo, then you can read this guide on how to clone private repo
Running the app
Login to the machine using SSH keys. Clone the repo and install dependencies.
git clone https://github.com/ksjitendra18/nextjs-todo.git
cd nextjs-todo
Install dependencies.
pnpm install
Now add your environment variables to the .env.production file.
Build the app and start the server.
pnpm build

pnpm start
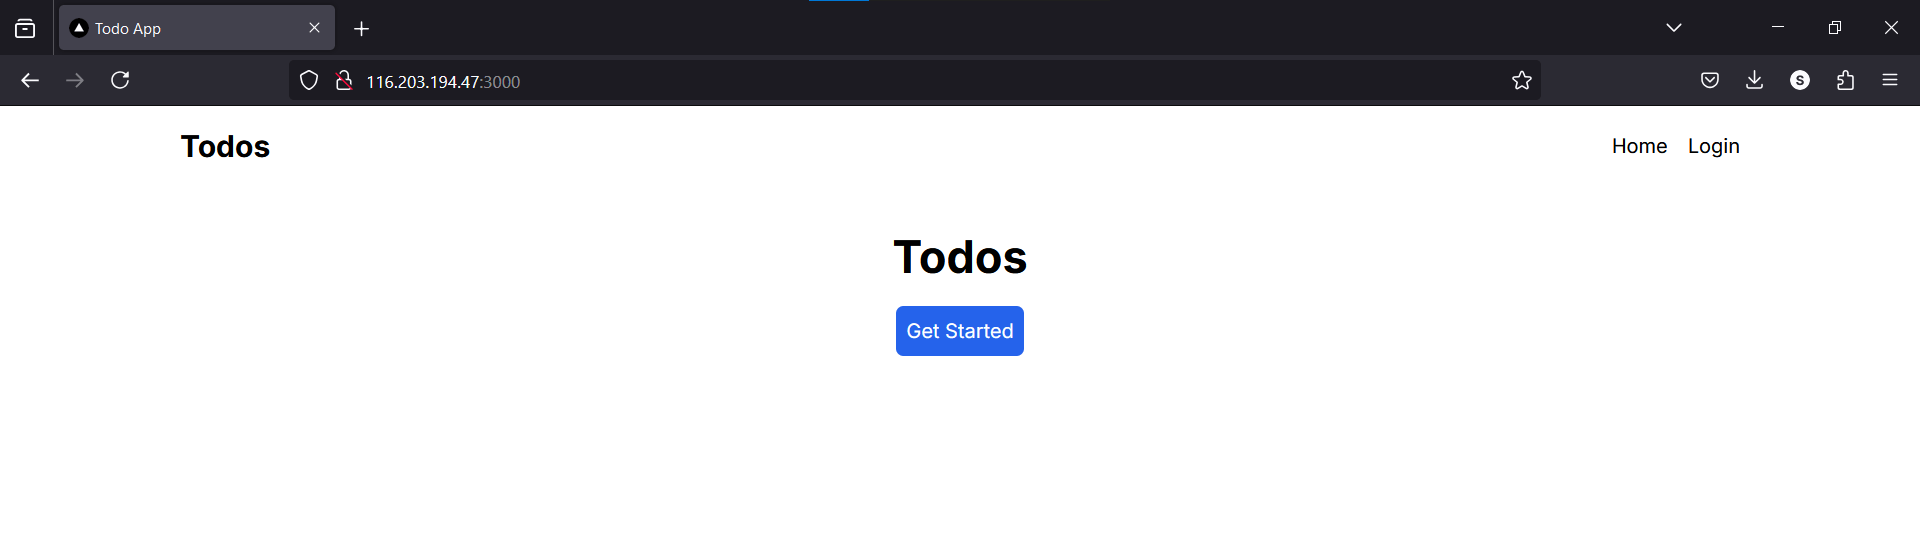
Now you can access the app at http://server_ip:3000.
Depending on your host firewall, you may need to open the port 3000 for the server to work. In hetzner all the ports are open by default. We will configure the firewall in the later step.
Installing PM2
We will use PM2 to run the app in the background. PM2 is a process manager for Node.js applications. It allows you to run your Node.js application as a background process, which can be restarted on errors or system reboots.
npm install -g pm2
Now to run the app run the following command.
pm2 start npm --name "nextjs-todo" -- start

# specify the custom port to run multiple apps

pm2 start npm --name "nextjs-todo" -- start -- -p 3001
You can check the status of the app by running the following command.
pm2 status

pm2 list
Installing Nginx
So let’s setup Nginx to serve our app. It will also us to access the app using a domain name. There are multiple reverse proxy like nginx, apache, caddy etc. We will use nginx as it easy to configure and fast.
Installing Nginx
Install Nginx on the server.
sudo apt update
sudo apt install nginx
Configuring Nginx
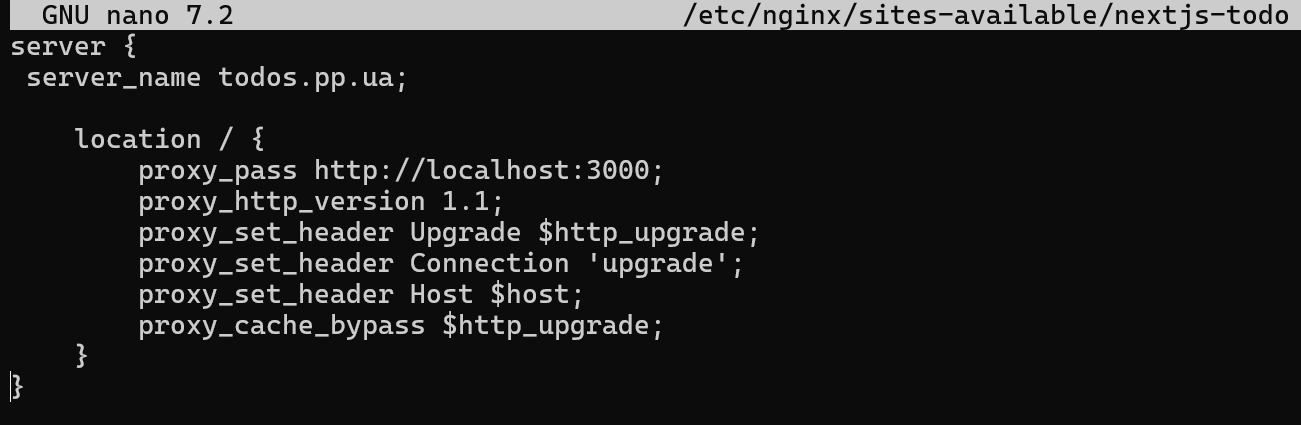
Create a new configuration file for Nginx. Use your project name or more preferably your domain name.
sudo nano /etc/nginx/sites-available/nextjs-todo
Add the following configuration to the file. Last two configuration is there to enable streaming.
server {
    server_name your_domain_name.com;

    location / {
        proxy_pass http://localhost:3000;
        proxy_http_version 1.1;
        proxy_set_header Upgrade $http_upgrade;
        proxy_set_header Connection 'upgrade';
        proxy_set_header Host $host;
        proxy_cache_bypass $http_upgrade;

        proxy_buffering off;
        proxy_set_header X-Accel-Buffering no;
    }
}
Save and exit the file.
Now create a symbolic link to the sites-enabled directory.
sudo ln -s /etc/nginx/sites-available/nextjs-todo /etc/nginx/sites-enabled/
Now test the configuration and also restart the nginx service.
sudo nginx -t
sudo systemctl restart nginx
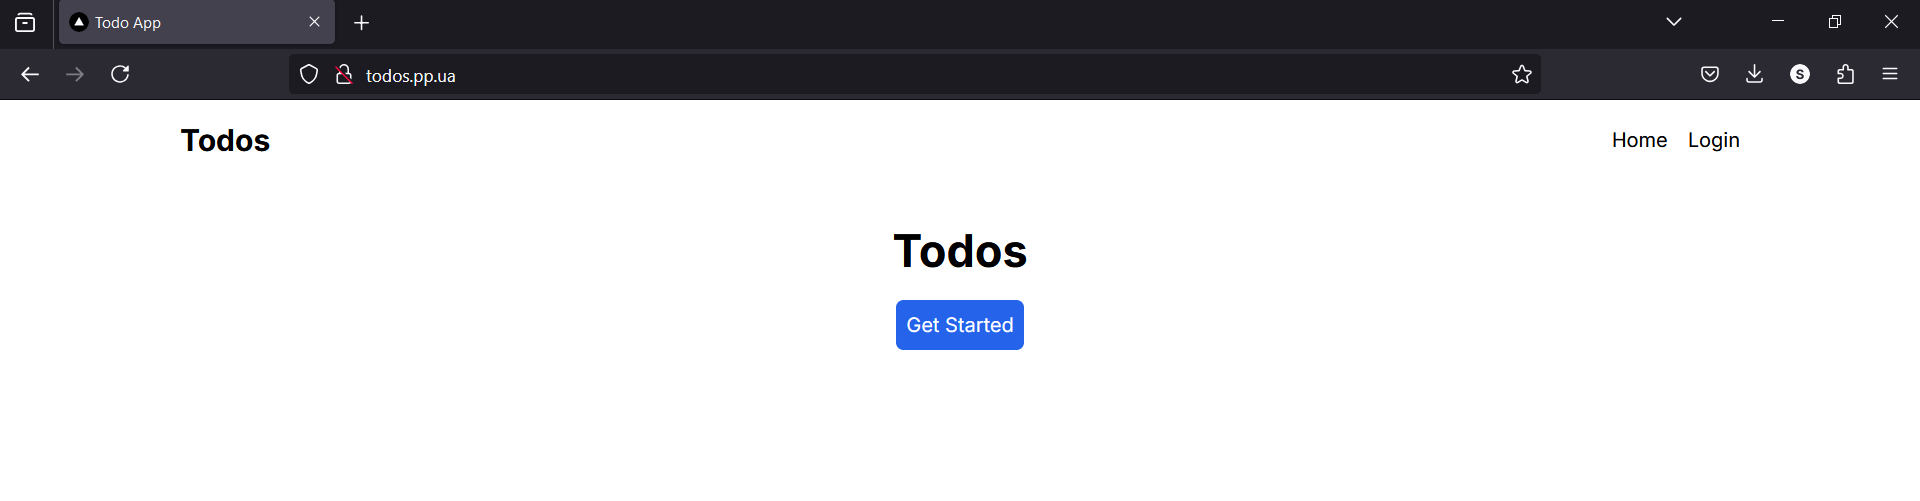
Before we can access the app we need to setup the domain.
Setting up the domain
We need to point the domain name to server IP. You have to add A record to your domain provider. I am using cloudflare so I am adding the record in the cloudflare dashboard.
I have added 2 records. I want to redirect www to non-www.
A record @ pointing to the server IP
AAAA record ‘www’ pointing to “100::”
(this might be cloudflare specific)

Now you can access the app at http://your_domain_name.com.
Setting up SSL Certificate
The website is being served via HTTP. We need to setup SSL certificate. To do this we need to install certbot on the server.
If you have firewall enabled you will have to open port 80 for the certbot to work. Also wait till DNS propagation is complete.
Installing Certbot
sudo apt install certbot python3-certbot-nginx
Now let’s get the certificate for the domain.
sudo certbot --nginx -d your_domain_name.com
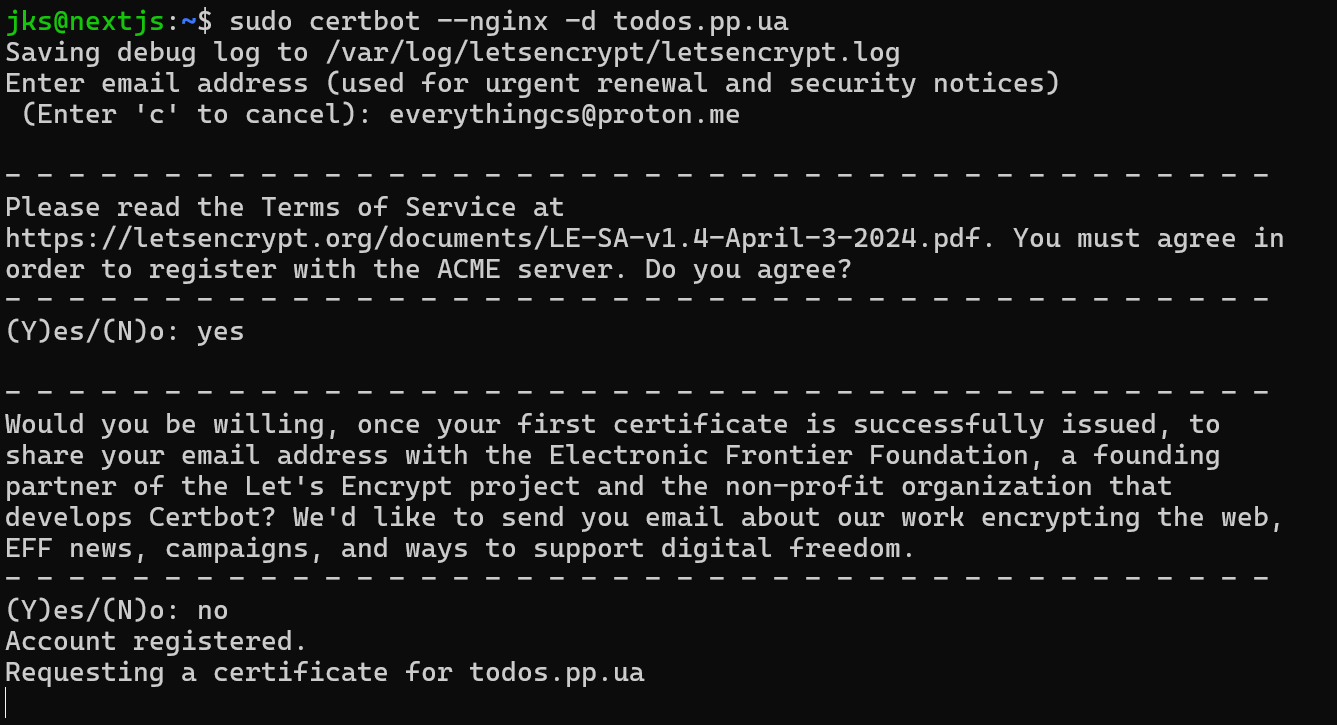
If you are using cloudflare, please select the Full mode in SSL/TLS mode.
Now you can access the app at https mode.
Setting up the firewall
Let’s setup the firewall and close all the ports except the ones we need. I am going to use ufw for this.
Check the current status of ufw.
sudo ufw status
Let’s open port for SSH and HTTPS and finally enable the firewall.
sudo ufw allow OpenSSH
sudo ufw allow 'Nginx HTTPS'
sudo ufw enable

If in future you want to create ssl certificate for any other domain you will need to open port 80.
Github Actions
Now let’s setup github actions for automatic deployments.
Setting up Github Actions Secrets
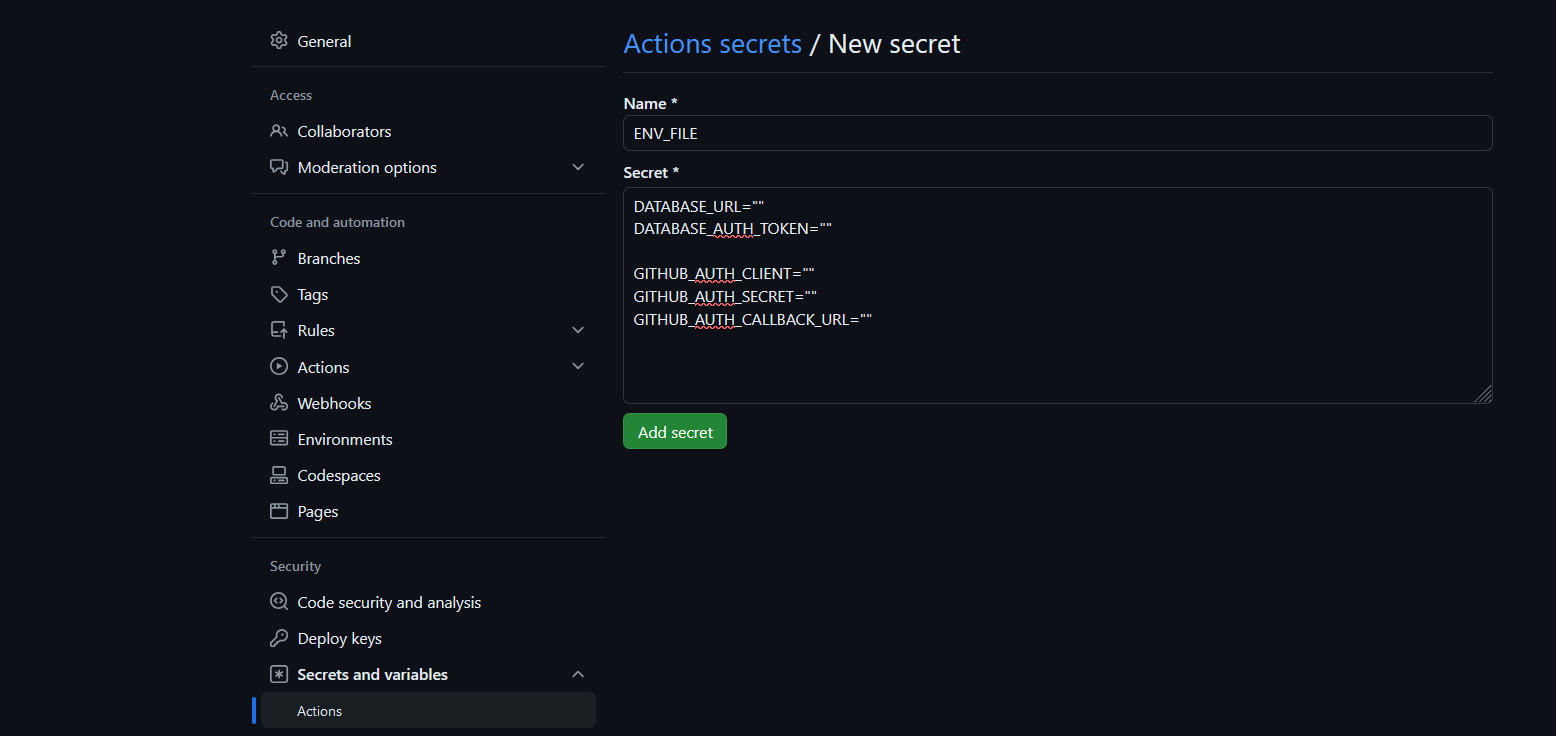
Go to the repo settings and go to Security section in the left sidebar and you will find the Secrets and Variables section. Click on Actions.
Click on Add New Repository Secret.
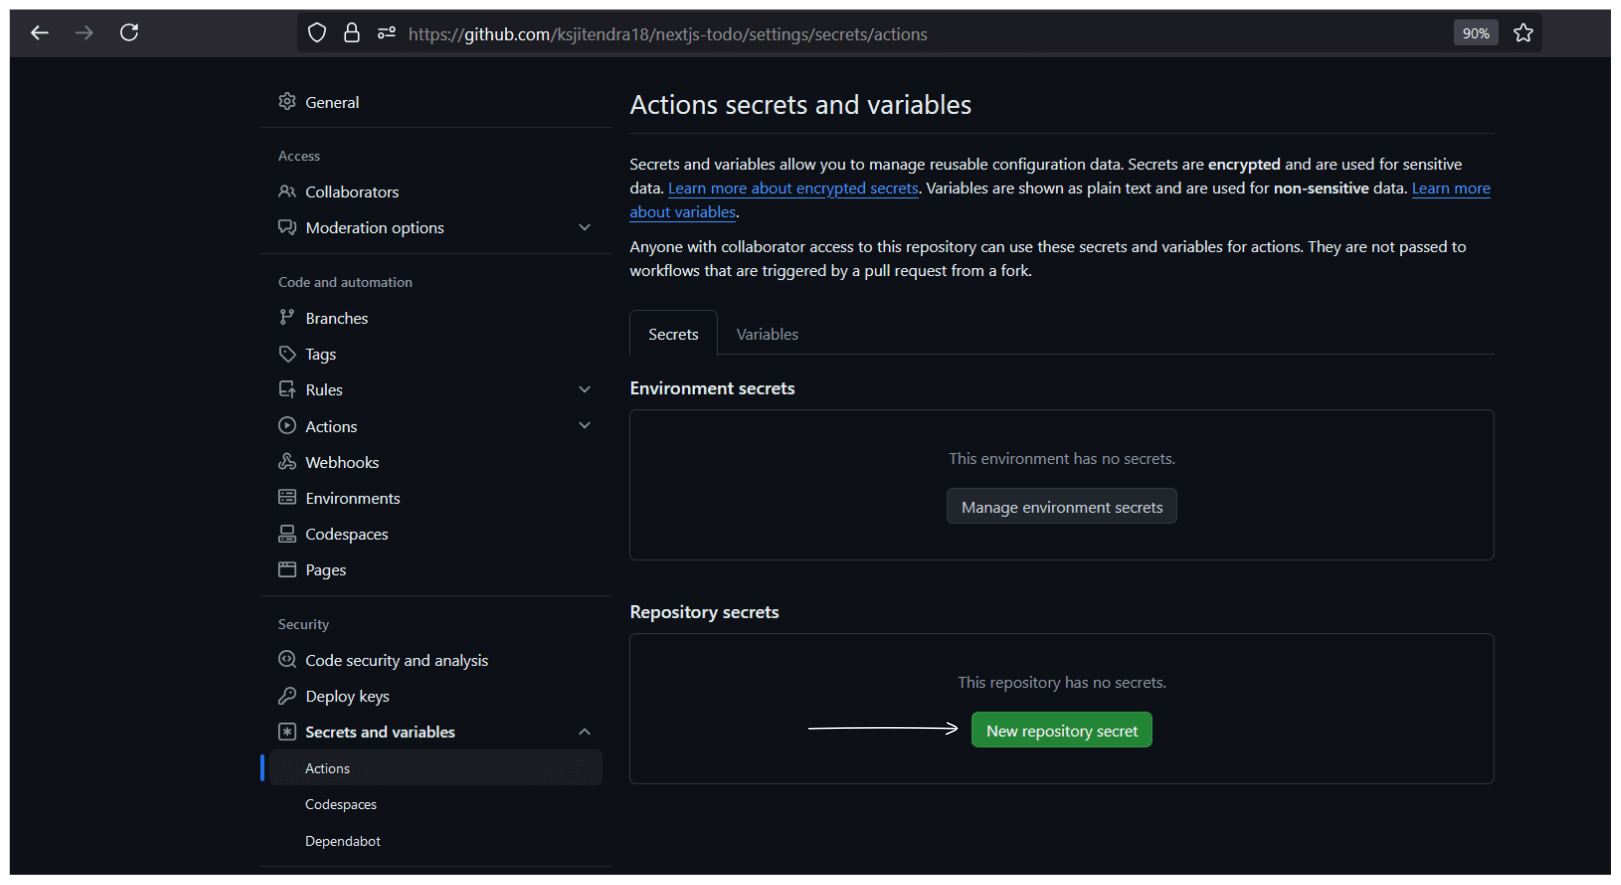
Add the variable which are present in your .env.production file. I am naming it ENV_FILE.
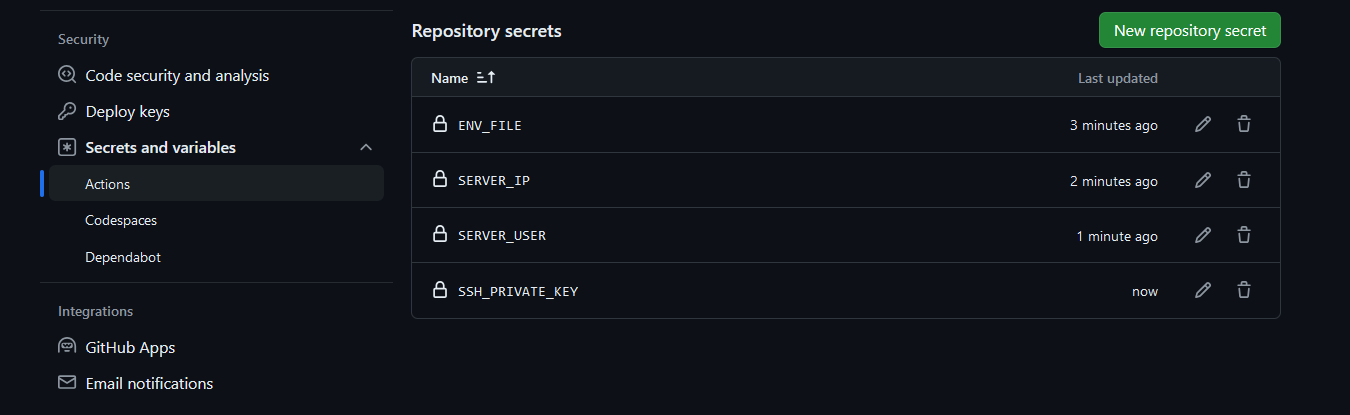
Now add the other secrets.
SERVER_IP
SERVER_USER
SSH_PRIVATE_KEY
It is recommended to create new SSH keys for the github actions. Follow the above steps create a new SSH key and add the public key to the authorized keys file. Just paste the new public key in authorized keys file below the existing keys.
Now that we have added the secrets, we need to add the workflow.
Setting up Github Actions Workflow
Open the repo in your code editor and add the following workflow.
Create a new folder named .github and inside that create a folder named workflows.
Inside the workflows folder create a file named main.yml.
name: Main Workflow

on:
  push:
    branches:
      - main

jobs:
  build-and-deploy:
    runs-on: ubuntu-latest

    steps:
      - name: Checkout
        uses: actions/checkout@v4

      - name: Install pnpm
        uses: pnpm/action-setup@v3
        with:
          version: 9
          run_install: false

      - name: Set up Node.js
        uses: actions/setup-node@v4
        with:
          node-version: "20"
          cache: "pnpm"

      - name: Cache Next.js build
        uses: actions/cache@v4
        with:
          path: |
            ~/.pnpm-store
            ${{ github.workspace }}/.next/cache
          key: ${{ runner.os }}-nextjs-${{ hashFiles('**/pnpm-lock.yaml') }}-${{ hashFiles('**/*.js', '**/*.jsx', '**/*.ts', '**/*.tsx') }}
          restore-keys: |
            ${{ runner.os }}-nextjs-${{ hashFiles('**/pnpm-lock.yaml') }}-

      - name: Install dependencies
        run: pnpm install --frozen-lockfile

      - name: Create .env file
        run: |
          echo "${{ secrets.ENV_FILE }}" > .env.production

      - name: Build application
        run: pnpm run build

      - name: Deploy
        env:
          SSH_PRIVATE_KEY: ${{ secrets.SSH_PRIVATE_KEY }}
          SERVER_USER: ${{ secrets.SERVER_USER }}
          SERVER_IP: ${{ secrets.SERVER_IP }}
        run: |
          mkdir -p ~/.ssh
          echo "${{ secrets.SSH_PRIVATE_KEY }}" > ~/.ssh/id_rsa
          chmod 600 ~/.ssh/id_rsa
          ssh-keyscan -H ${{ secrets.SERVER_IP }} >> ~/.ssh/known_hosts
          ssh -o StrictHostKeyChecking=no "${{ secrets.SERVER_USER }}@${{ secrets.SERVER_IP }}" << 'EOF'
            cd ~/nextjs-todo
            export NVM_DIR="$HOME/.nvm"
            [ -s "$NVM_DIR/nvm.sh" ] && \. "$NVM_DIR/nvm.sh"
            echo "Node version: $(node --version)"
            echo "NPM version: $(npm --version)"
            git pull
            pnpm install
            pnpm run build
            pm2 restart nextjs-todo
          EOF
Now if you have resource constrained server then you can copy the .next folder to the server and skip the build step in your server.
I haven’t tested this extensively but I am already using in one of my projects and haven’t faced any issues yet.
Copy the .next folder to the server
In this approach we will skip the build step and copy the .next folder to the server.
I am creating new file for dev branch although I have not this branch but you can use it for development previews. Just you will have to create a new folder and clone the dev branch. Just same steps as above. Use a domain name like dev.your_domain_name.com.
name: Dev Workflow

on:
  push:
    branches:
      - dev

jobs:
  build-and-deploy:
    runs-on: ubuntu-latest

    steps:
      - name: Checkout
        uses: actions/checkout@v4

      - name: Install pnpm
        uses: pnpm/action-setup@v3
        with:
          version: 9
          run_install: false

      - name: Set up Node.js
        uses: actions/setup-node@v4
        with:
          node-version: "20"
          cache: "pnpm"

      - name: Cache Next.js build
        uses: actions/cache@v4
        with:
          path: |
            ~/.pnpm-store
            ${{ github.workspace }}/.next/cache
          key: ${{ runner.os }}-nextjs-${{ hashFiles('**/pnpm-lock.yaml') }}-${{ hashFiles('**/*.js', '**/*.jsx', '**/*.ts', '**/*.tsx') }}
          restore-keys: |
            ${{ runner.os }}-nextjs-${{ hashFiles('**/pnpm-lock.yaml') }}-

      - name: Install dependencies
        run: pnpm install --frozen-lockfile

      - name: Create .env file
        run: |
          echo "${{ secrets.ENV_FILE }}" > .env.production

      - name: Build application
        run: pnpm run build

      - name: Deploy
        env:
          SSH_PRIVATE_KEY: ${{ secrets.SSH_PRIVATE_KEY }}
          SERVER_USER: ${{ secrets.SERVER_USER }}
          SERVER_IP: ${{ secrets.SERVER_IP }}
        run: |
          mkdir -p ~/.ssh
          echo "${{ secrets.SSH_PRIVATE_KEY }}" > ~/.ssh/id_rsa
          chmod 600 ~/.ssh/id_rsa
          ssh-keyscan -H ${{ secrets.SERVER_IP }} >> ~/.ssh/known_hosts
          rsync -avz -e "ssh -o StrictHostKeyChecking=no" ./.next/ ${{ secrets.SERVER_USER }}@${{ secrets.SERVER_IP }}:~/todo-app-dev/.next/

          ssh -o StrictHostKeyChecking=no "${{ secrets.SERVER_USER }}@${{ secrets.SERVER_IP }}" << 'EOF'
            cd ~/onlinecourseplatform
            export NVM_DIR="$HOME/.nvm"
            [ -s "$NVM_DIR/nvm.sh" ] && \. "$NVM_DIR/nvm.sh"
            echo "Node version: $(node --version)"
            echo "NPM version: $(npm --version)"
            git pull origin dev
            pnpm install --frozen-lockfile
            pm2 restart todo-app-dev
          EOF
Now we have automatic deployments for main and dev branches.
Conclusion
In this step by step guide I have demonstrated how to self host Next.js applications on the virtual machine. Also we have added github actions for automatic deployments.
I have used this repo to demonstrate the process. Free free to use it.
In the upcoming post I will show how to host nextjs application using docker.
If you have any query then you can ask on EverythingCS discord server.